The wood stack is gone. We loaded it into a truck yesterday and took it to the local landfill. My neighbor didn't want to burn it, because it would leave behind screws and other metal things that would damage his tractor tires.
I've started unbolting the floor-pan from the trailer. Besides bolts, it seems there are all kinds of other strange connectors ... ground straps, cable ties, tanks, etc. So I am still working on this. Trying to save the gray-water tank, but get rid of the black-water tank. Gotta peal the vinyl off the OSB to find the bolt heads. Sort of attempting to save the metal pan that the floor is built in. We'll see.
Dec 18, 2010
Dec 11, 2010
Big Stacks

There it is ... down to the floor ...
and most of the stuff neatly cleaned up.

Divided into sections ... the walls and roof
stacked for the trip to the landfill.

Aluminum siding to be sold at the recycle place.

This is the roof aluminum,
but it has sealant, gummy stuff, and staples in it.
I don't know if the recycle place will take it.
Dec 9, 2010
The Roof Comes Off!

A couple of the grandsons help me fight our way into the screws so we could remove the metal from the roof. Along each end there is a re-enforcing strip, kind of a shallow "u-channel", with screws spaced every 5 inches. Each screw head had a generous glob of silicone on top of it. Then all of that was well covered with a tar-backed fabric/plastic strip. And I didn't have a blow torch to warm it up and remove it. So, one grandson used a brick hammer to chip away the covering strip and soften up the silicone globs. Then another used a putty knife to pry the silicone away from the screw heads. And I used the thin tip of one of my pocket knife blades to pry the silicone out of the square pocket in the screw heads. Then we could finally remove the screws. We decided not to fight the tape & silicone covering around all the vents ... So, using strokes of my hatchet through the thin aluminum ... I cut around the vents and we pealed the aluminum top off. What you see here is what remained after we bagged the fiberglass insulation.

This is back under the bottom bunk where there is a large amount of damage.

The cinder block is where the door used to be.
The steps were no longer functional because the bolts had pulled down out of the wooden framework. And you can see all the wood rot through the dining and door areas of the floor. The grandsons loved the "destruction" part of deconstruction. :)
Dec 7, 2010
And Down It Went ...

I pushed it off to the downhill side.
This will make it easier to work on stripping the roof section.

This is what it looks like from the bathroom end.
The outside bunkbed wall was rotted out ... flimsy.

Next is working on this ...
Removing the refrigerator vent. The pop-up bubble vents (trash).
And separating the skin from the wood.
All the wood goes into the burn pile, the aluminum to recycle.
Leaving the floor to be removed from the trailer ... in due time.
Dec 6, 2010
Be Careful Where You Walk

I took some screws out of the left side ...
and the front panel just fell out.
Love that wood rot.

You can stand out front and look clear through to the rear.
Kind of empty and spacious.

Both sides have now been stripped.
If you pull on something, the trailer rocks back and forth.
Getting to the point where it is scary to step inside.

Look at all this wood rot.
This is the corner with the bunk beds ...
Where did all that water come from??
Dec 4, 2010
Stripping Down The Trailer 2

No doors or windows remaining. All Gone.
Still gotta get that awning off of there.

Pulled all the wires off this side and front end.

It looks huge and spacious with everything removed.

Taken through the front window hole looking towards the back.
The bathroom wall on the right is held on by the 50 staples they put down through the ceiling panel. I'll get the left wall loose after I get the siding off and can remove the screws coming into it from the outside.
The wife said, "Forget the fresh water tank ... we aren't doing that. We will be using city or well water pumped in. That old propane heater isn't happening either. I'd rather have a "tiny cod" wood stove. And see if you can squeeze a bathtub in here." Those are my marching orders for the moment. And I need to buy the 4 windows for the dormer area.
Dec 3, 2010
Stripping Down The Trailer 1

One side is stripped down and the
refrigerator cabinet inside has been removed.

All the corners look like this ...
wood rot.

Look at all that wiring.
The red is 12 volt DC.
The black is 120 volt AC.
The green & white go to the marker & tail lights.
Nov 16, 2010
SIP's - Pricing
I went down to Lowe's and tried to wrap my head around how much it would cost in lumber, and insulation ... plus how much time I would spend putting all that together. True, going that way I could piece things together as I went along and could afford them.
HOWEVER, I also wanted to see what it would cost if I purchased SIP's (Structural Integrated Panels) for the floor (base), walls, lofts, and roof. The base, walls, lofts, and roof could all be put up within one day. Can you imagine having it completely "dried-in" within one day?!! I specified 8 window openings and 1 door. I forgot the opening for the water heater. And I specified dormers 9 ft long over both sides of the sleeping loft area. Anyway, here is the quote ... to have the materials delivered to my location.
You can click on these written images below to enlarge them for better reading:


Here are some more technical details ...

So, here comes the ballpark price quote ...

Notice that part about transportation to my location as being included!
and then here comes the basic legalese ...

I need to quit spending money on interior things and save my pennies to make those payments. It may be March before I can do this.
The trailer will certainly be ready before then.
I could probably cut down my costs somewhat if I sent a truck & trailer to pick up and bring back the load (paying for fuel). Then I wouldn't have to worry about that 2 hr unloading limitation. And I'd have it inside a dry-van.
Nov 12, 2010
Cleaning - 1
Having removed so many things and stacked them up inside the trailer ... it was time to clean things out so I could get on with other things.

Here is looking from the door towards the back end.

This is what it looks like this evening.

Looking from the bathroom back towards the door.

You can see a lot more room this evening.

The air conditioner is a bit heavy for one person to lift off the top of the trailer while standing on a ladder. The top half just lifts out ... after you unbolt it from the bottom (inside unit).
Nov 11, 2010
De-Construction 7 (Bottom Bunk)

This is the bottom bunk area.
The heater system, freshwater tank, and water pump are removed.

Look at all that water damage in the corner.
Everything out of the bunk bed area.

This is the freshwater tank and water pump.
The pump must be a replacement ...
It was built in 1994 and the trailer was built in 1985.
Next up: climb on the roof and remove anything up there ...
Nov 9, 2010
De-Construction 6 (Bathroom)

All the cabinets have been removed from the bathroom.
The toilet and tub are gone too.
It helps to come back at things when you have a fresh burst of energy.

The tub in all its glory ...
outside sitting on the grass.
Maybe my neighbor would like to put it in his bathroom.
It is bigger than the one he has ...

There's the bathroom with no bathtub.
Notice all the rot damage to the floor and walls.
Notice all the rot damage to the floor and walls.

The top bunk is gone ... now for the bottom bunk.
You can see the damage in the corner ...

With the bottom bunk gone ...
there is the heater and the fresh water tank.
Perhaps I will get them out tomorrow.
Nov 6, 2010
In Between ...
In between work and rain ... progress has been slow this week. Speaking of which, it is time for me to run off to a camp activity with client kids. See Ya! :-)
Small Homes

On St. James Pl., down behind the Methodist church, is this lovely little row of 500 sq. ft. homes. Mr. Blankenship built them as rentals. They have metal roofs and are each painted a different pastel color to make it easier to find yours, due to their otherwise being identical.

They each have a lovely small front porch that you can place a rocker on .. along with a little side-table. And the the windows are double-pane. You will notice that each small house has 2 parking spots out front.
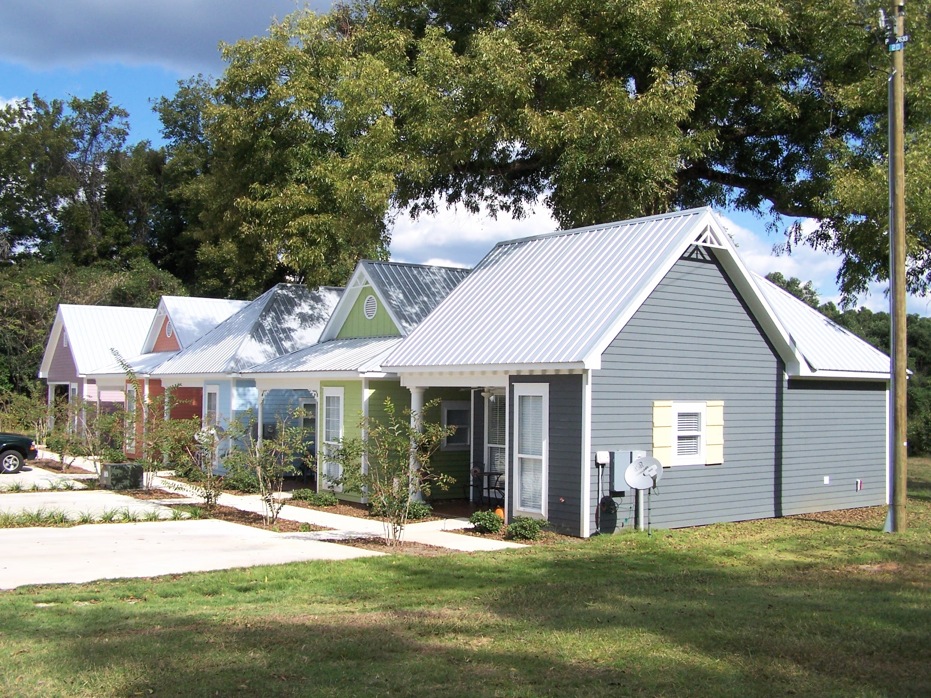
The tenants say that they are all extremely well insulated. Which saves considerable on their electric bill. And they are allowed to keep their little dogs at home without an extra fee. Rental is under $500 a month.

The yards are of a minimal size so that the tenants don't have a lot of upkeep. Mr. Blankenship is familiar with the members of the local zoning commission, and wrote up zoning paperwork that was acceptable to them. After completion, it only took 3 weeks for them to all be rented out for the year.
These are located within a block of the downtown area. Just walking distance to the supermarket, a dollar store, several restaurants, city hall, and an art gallery. The library and hospital are within walking or bicycling distance [4 blocks]. WalMart is just far enough away to provide some logistical challenges -- bicycle with cart or taxi (according to the tenants).
Oct 30, 2010
De-Construction 5 (Bathroom)

The toilet is out.

The sink & faucet are out.
This cabinet is nice, but won't fit against a straight back wall.

The cabinet doors are out.
(and so is the window)

I tried the tub ...
I could get down into it ... with my knees in the air.
But there was just no getting out of it without major help.
I think that I've gotten all I want out of the bathroom.
I'm running out of de-construction steam ...
at least for today.
Next is the fresh water tank and water pump under the bunkbed.
Oct 29, 2010
The Water Heater

This is the old water heater unit.

This is what is under the panel cover.

Here is the backside of the water heater.
This is a little 6 gallon tank.
To remove, you detach the gas line from the front panel
and the two hoses from the back panel. and then just
pull it out (this is after the removal of all 20 screws).

This may be the single most expensive item in the new tiny house.
The RV500 tankless water from Precision Temp.
This comes well packed with fragile stickers all over it ...
and the admonition to inspect it within 48 hours and report back to
Precision Temp about any damage.
Notice the dinged corner ...

That dinged corner resulted in this bending of the white surface-mount door assembly. I lifted it out and inspected everything. Then reported it to Precision Temp. But there appears to only be this cosmetic bent corner, which I straightened out. The flange behind it wasn't bent. And everything else seemed to be in order.

This is what it looks like from the front.
This unit is 1" wider and 2-1/2 " taller than the 6 gallon tank unit.
If you are doing a retro-fit, you will have to make the hole bigger.

With the white cover off ... This is what the interior looks like.
On the left is the unit that the water flows through and gets heated.
to the right is the propane unit ... near the bottom is the water safety release valve. And the drawer with the red & green LED's contains the circuit boards.

Here with the drawer open, you see the circuit boards.
In the upper right corner is the wind fan unit.

Note this label on top.
You can add a wind protection fan unit (this can be retro-fitted). If you use your RV where wind gusts are common such as the desert or shore areas or use your RV at high altitudes, the Wind Protection Fan is strongly recommended.
This cold weather package (which includes the fan) -- you can ONLY get at the time of ordering the RV500. This is due to it being factory installed. The Cold Weather Package will protect the RV-500/501 at temperatures as low as -20°F (-29°C). And costs an extra $110.

Here's the back left corner view.
I'm not sure what that thing on the side is for ...
haven't read the manual yet.

Clockwise from top left .. propane line hole, cold water input line, hot water output line, and 12 VDC wires to power everything inside the unit.
Subscribe to:
Posts (Atom)