The Creation Begins with Destruction

The trailer has been re-located down next to the cabin. I've got the pressure-treated lumber to build the base. And if my motivation keeps up, I should have it framed in by the end of the summer. Hopefully.

Nov 9, 2010

De-Construction 6 (Bathroom)

All the cabinets have been removed from the bathroom.
The toilet and tub are gone too.
It helps to come back at things when you have a fresh burst of energy.

The tub in all its glory ...
outside sitting on the grass.
Maybe my neighbor would like to put it in his bathroom.
It is bigger than the one he has ...

 There's the bathroom with no bathtub.
Notice all the rot damage to the floor and walls.

The top bunk is gone ... now for the bottom bunk.
You can see the damage in the corner ...

With the bottom bunk gone ...
there is the heater and the fresh water tank.
Perhaps I will get them out tomorrow.

Nov 6, 2010

In Between ...

In between work and rain ... progress has been slow this week.  Speaking of which, it is time for me to run off to a camp activity with client kids.  See Ya!  :-)

Small Homes

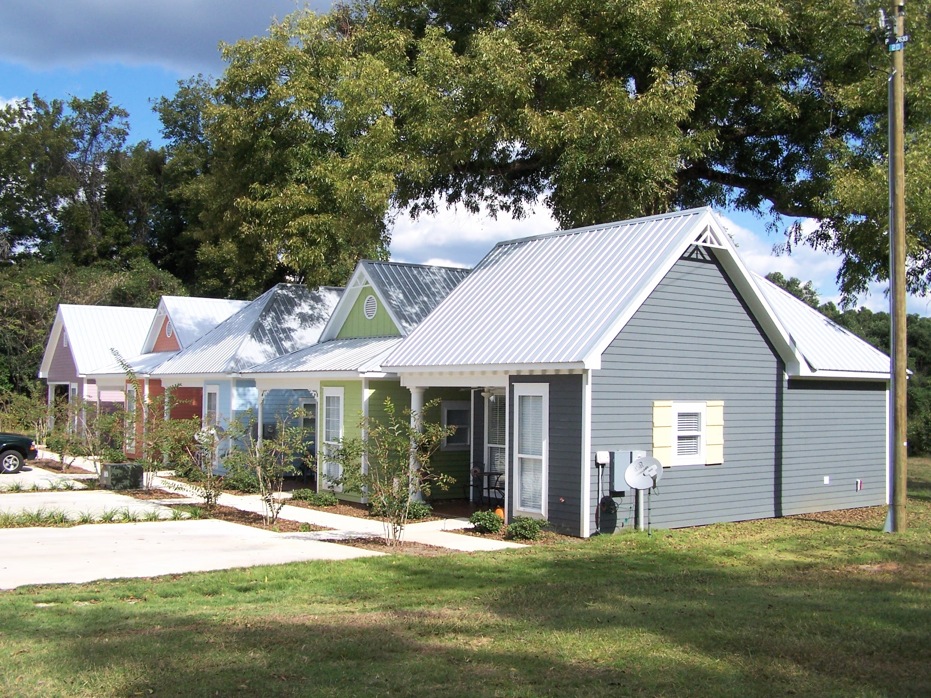
On St. James Pl., down behind the Methodist church, is this lovely little row of 500 sq. ft. homes.  Mr. Blankenship built them as rentals.  They have metal roofs and are each painted a different pastel color to make it easier to find yours, due to their otherwise being identical.

They each have a lovely small front porch that you can place a rocker on .. along with a little side-table.  And the the windows are double-pane.  You will notice that each small house has 2 parking spots out front.

The tenants say that they are all extremely well insulated.  Which saves considerable on their electric bill.  And they are allowed to keep their little dogs at home without an extra fee.  Rental is under $500 a month.

The yards are of a minimal size so that the tenants don't have a lot of upkeep.  Mr. Blankenship is familiar with the members of the local zoning commission, and wrote up zoning paperwork that was acceptable to them.  After completion, it only took 3 weeks for them to all be rented out for the year.

These are located within a block of the downtown area.  Just walking distance to the supermarket, a dollar store, several restaurants, city hall, and an art gallery.  The library and hospital are within walking or bicycling distance [4 blocks].  WalMart is just far enough away to provide some logistical challenges -- bicycle with cart or taxi (according to the tenants).

Oct 30, 2010

De-Construction 5 (Bathroom)

The toilet is out.

The sink & faucet are out.
This cabinet is nice, but won't fit against a straight back wall.

The cabinet doors are out.
(and so is the window)

I tried the tub ...
I could get down into it ... with my knees in the air.
But there was just no getting out of it without major help.
I think that I've gotten all I want out of the bathroom.

I'm running out of de-construction steam ...
at least for today.

Next is the fresh water tank and water pump under the bunkbed.

Oct 29, 2010

The Water Heater

This is the old water heater unit.

This is what is under the panel cover.

Here is the backside of the water heater.
This is a little 6 gallon tank.
To remove, you detach the gas line from the front panel
and the two hoses from the back panel. and then just
pull it out (this is after the removal of all 20 screws).

This may be the single most expensive item in the new tiny house.
The RV500 tankless water from Precision Temp.
This comes well packed with fragile stickers all over it ...
and the admonition to inspect it within 48 hours and report back to 
Precision Temp about any damage.
Notice the dinged corner ...

That dinged corner resulted in this bending of the white surface-mount door assembly.  I lifted it out and inspected everything.  Then reported it to Precision Temp.  But there appears to only be this cosmetic bent corner, which I straightened out.  The flange behind it wasn't bent.  And everything else seemed to be in order.

This is what it looks like from the front.  
This unit is 1" wider and 2-1/2 " taller than the 6 gallon tank unit.
If you are doing a retro-fit, you will have to make the hole bigger.

With the white cover off ... This is what the interior looks like.
On the left is the unit that the water flows through and gets heated.
to the right is the propane unit ... near the bottom is the water safety release valve.  And the drawer with the red & green LED's contains the circuit boards.

Here with the drawer open, you see the circuit boards.
In the upper right corner is the wind fan unit.

Note this label on top.  

You can add a wind protection fan unit (this can be retro-fitted).  If you use your RV where wind gusts are common such as the desert or shore areas or use your RV at high altitudes, the Wind Protection Fan is strongly recommended.  

This cold weather package (which includes the fan) -- you can ONLY get at the time of ordering the RV500.  This is due to it being factory installed.  The Cold Weather Package will protect the RV-500/501 at temperatures as low as -20°F (-29°C).  And costs an extra $110.

Here's the back left corner view.  
I'm not sure what that thing on the side is for ...
haven't read the manual yet.

Clockwise from top left .. propane line hole, cold water input line, hot water output line, and 12 VDC wires to power everything inside the unit.

Oct 27, 2010

De-Construction 4

This is the outside view of the back of the refrigerator.
Here is where I disconnect the 12VDC lines, the 120VAC plug
and the copper gas line ... along with 4 screws.

The refrigerator as seen from the entire back.
when removed.

This is the outside of the water heater.
I took out all those screws & disconnected the gas line.
Inside I disconnected the two water lines.
Then I simply pulled this little 6.2 gallon tank out.

There were 4 screws around the front of the refrigerator. 
After I took those out, it still didn't want to come out.  It is HEAVY and I had to overcome inertia to get it out.  (I used a pry bar) then gently rocked it back and forth until I could ease it down on the floor. You can see the insulation that surrounded it.  Toward the back is a vertical shaft that goes up and through a screen to an outside vent.  There is actually unused space above the refrigerator for possible storage.

Look at the picture above this one and then back at this one.  I removed the insulation from around the refrigerator box.  Saw that there are screws coming from the outside, through the side wall, to hold this cabinet in place.  So I took out the screws holding the closet frame in place and removed it.  Yes, it had 50 staples along the top edge.

This is what is under the closet.
The 12VDC lines (red & white)
the 120VAC lines (black & white -- 
but mostly just appearing black here.)
the drain lines and the water lines.
And an extra group of wires from the tanks. (middle left)

Bathroom next ...

Oct 26, 2010

De-Construction 3

This is the dinette area ... now minus the overhead cabinet.

This is the sink/stove area minus the overhead cabinet.

Here is what was holding the cabinets to the ceiling ...
after removing all the screws by hand,
then using a pry-bar to wedge them loose:
Lots and Lots of staples!
(from above)

There was light in the bathroom!!
The tarp had blown off the window and skylight.

The refrigerator is next ...
(if I keep saying that - it will come true)