The Creation Begins with Destruction

The trailer has been re-located down next to the cabin. I've got the pressure-treated lumber to build the base. And if my motivation keeps up, I should have it framed in by the end of the summer. Hopefully.

Jun 9, 2019

Down the Tubes

Well, that went down the tubes to incompletion.  And got sold.

Just made a bicycle cart ... but can’t remember how to access my Freth’s Recumbents site.


Jan 4, 2018

Change of location

Due to a death in the family, we had to relocate to another state.  We gave the trailer frame to our landlord and he managed to sell it.

May 29, 2013

Slaving Away on the Base

I've spent 2 days slaving away on the base.  I think I have enough basic support.

It is 8 ft wide and 20 ft long.  It's 2" longer on the front than the original camper.  7-1/2" Longer in the rear because I extended from where the back wall used to be, to the back edge of the bumper.  That gave me the total 20 ft length.  The original width was 7ft-8".  I widened it 2" on each side to get the 8ft width.  Due to using 2x4's instead of 1x2's, the inside space will be about the same as the original camper ... just better insulated.

I still need to run some strips up the middle and re-enforce a couple of spots before covering it up.


I kept the original gray-water and black-water tanks.  The black-water tank will be used for the tub.  The gray-water tank will be for the sinks.  We'll be using a sawdust toilet -- we've had good experience with it.


Up towards the front there are things that just don't line up.  Side tabs not lined up with the metal cross-ties.  Step tabs that are just wonky.  I did put crosswise 2x4's centered at the 8ft and 16ft points.  That's so my plywood sheets will properly secure lengthwise.  This all makes for inconsistent measurements between the 2x4's.  And the more expensive pressure treated 2x4's are the ones that warped the most.


I'm going to have to shave the high spots on the twisty 2x4's to level out the floor surface.  I'll use my triangular toothed tree saw to do that.  It's called improvise to make it correct.

My neighbor has offered to use the forks on the front of his tractor to lift the wood frame off the metal frame so I can put flashing on the bottom.  Then he will put it back on the metal frame.  And I can proceed from there.

Nov 20, 2012

Relocated .. and some progress

My landlord moved the trailer down next to our cabin. This puts it in reach of the outdoor electrical outlet (30amp) that I installed. Just so I can weld and do other outdoor projects. The springs and one axle (the straight one) were sanded and painted black. The axles and tires are back on the trailer ... which aids in wheel well location and alignment. Today I started construction on the rear section of the wooden base. The base will be basically 3 parts that are connected together. The middle section is not as wide as the other two ... due to working around the wheel wells. Next I will need 5 sheets of plywood for the subfloor ... and so I can work on the issues pertaining to the plumbing for the bathtub and the sinks. That's the part that I'm trying to visualize right now. Once that is worked out, then I can get on with the side walls. Here's a photo

Jul 15, 2012

Procrastination is my name

I said I would go out and level the frame again ... but just haven't gotten to it in the heat. Tomorrow is another day for that... :-)

Jun 17, 2012

Shuffling the Trailer Around

The landlord was shuffling things a week ago in accord with his project plans ... so he put the extended forks on the front of his tractor, just picked up the entire frame, and moved it down next to the cabin ... where we re-stacked the bricks under it and set it down.  I've gotta straighten the brick piles a bit, make some wooden wedges, and get it all leveled out.


I've also purchased the pressure-treated lumber and flashing to build the wooden base.    Need the foam and 3/4" sheets to cover it.  Oh, and the plumbing connectors to come up through the base for the tub/shower, vent, and sink drains.  That will take some adjusting before I can frame up the walls.  I'm sure it would all be a lot easier if I wasn't dealing with the drain tanks.  But that gives me more options.


Nov 19, 2011

Tub/Shower Unit Purchase

     In rebuilding the camping trailer, we wanted to replace the bunkbeds in the back left corner with a tub/shower unit.  The original tub unit was so small that when sitting in it, your chin was on your knees.  And someone had to pull you up out of it ... impossible to get out on your own.
     Anyway, yesterday on the way to pay the utility bill, my wifes says that she wants to go to some yards sales to get some things.  I pass a yard sale sign.  Then a little further down the street, I turn and backtrack to connect up with the yard sale signs.  It didn't look like your typical yard sale ... almost no clothes, no toys, etc.  There were light fixtures, switches, door stops, a bay window, refrigerators ... It was like somebody had been remodeling and had all the leftover parts for sale.
     The prize for us was a tub/shower unit.  Brand new.  And for sale for way less than 1/3 the normal price.  We bought it.  And they delivered it to our place while we continued on to pay the utility bill.
     This was so fortuitous, I give praise to the Lord.  This had nothing to do with my normal lack of brilliance ... I'm usually quite bad at heeding promptings of the spirit.  But in this case, I overcame my normal rebellious nature and just went with it ... and the result was so fantastic!  Thanks Lord.
     The first thing after building the floor/base ... we will need this tub/shower unit so we can plumb to the waste water tank ... before the floor/base becomes a closed immoveable unit.  Then we'll have to build the walls up around the tub/shower unit ... because there would be no way to get it inside through the doorway or a window.
     I am so excited that things are ever so slowly coming together.  Framing and walls can go up pretty quickly.  It's the foundation work and the detail work that take so much time.

Nov 4, 2011

Leveled?!

I leveled the frame ... side-to-side and front-to-back.
A few more 2 x 4's and I can build the floor base.

Sep 19, 2011

Well ... uhhh

The front axle has a weird bump in it near the left side ... it HAS to be replaced.  But the measurements I'm recording of the bearing seats and axle are different from what is available online.  Nuts.  Well, I may as well by some flashing, 12- 2x4's, and a few sheets of plywood and at least make a base.

Jul 2, 2011

Monetarily Broke = Slow Progress

This is the front axle.
You see the dent (arch) in the axle towards the left side.
Bad news.
My wife wants me to replace both axles with new Reliable 3500 lb. axles.  
May be a delay getting around to that due to money shortage.  In the meantime, I need to put jackstands or scissor jacks under at least 3 points on each side and level the frame to construct the sub-floor/ foundation.

I've removed the springs and shackles.
Due to rust, just attempting to unbolt them didn't work.  I used the wire wheel in the drill to clean out the threads, then oiled them, and after that it wasn't so difficult to get them off.  I need to totally wire brush them and paint them. 

Jun 7, 2011

Brakes & Hubs

There was spider egg-sack and cockroach casings inside.
I brushed all that out.
The brake shoes still had plenty of lining on them
and the drums didn't show any signs of wear. 

After it was all brushed out ...
here's a view of the spindle.
Notice that the inner and out bearings are different sizes.
1-1/4" & 1-1/16"  respectively.
New axles have 1-3/8" on the inner bearing ... 
which is 1/8" larger than mine, so my hub won't work on them.
although new axles would be nice, I don't want to have to replace everything.

May 30, 2011

Tanks Back In

The support pieces have been fitted and bolted back in place.
The tanks are back in. 

Tanks viewed from the rear.
Next up are the axles ...

Just cooking in this heat ... nearly 100°F
very exhausting.
After this was done, I took the steps rod to the shop
and spent the remainder of the afternoon watching O.C.C.
(Orange County Choppers - NY) 

May 28, 2011

Camping Trailer - For Sale

I saw this recently and it is still for sale ...

I think that is in area code 334 ... 
call 334-405-9247 
They may have plugged all the leaks, but not before the damage was done to the frame ... believe me, there is wood rot ... but a 21 ft metal trailer with 18 feet of usable space for a tiny home (3 feet of the trailer is the tongue). 

front view 

rear view 

This was the bed area ... just around the corner to the right is a water heater 

I'm just showing one pic from the bathroom ...
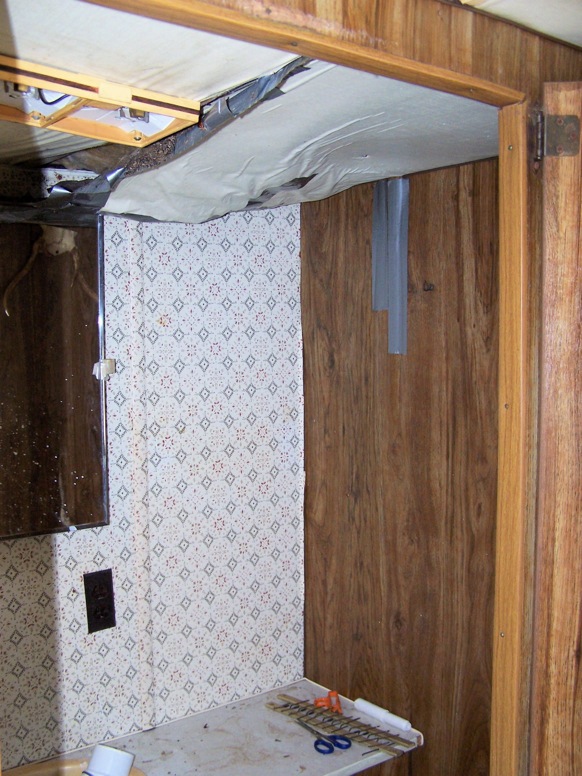
Notice the rotted ceiling coming down over the toilet? 

The front dining area that can also be made into a bed.
ripple-warped paneling is also a sign of wood rot. 

They ripped out the kitchen sink and plumbing.
But hey, they left the stove.
And all the knobs are on it (those knobs are hard to come by) 

Yeah, the refrigerator is missing ...
but the dining table is still there. 

You can save the windows, dining area, the stove, the water heater tank, and whatever you want to keep from the bathroom.  There is one tank under the trailer.  And the metal frame needs wire-brushing or sanding or sandblasting before you re-paint it.

May 27, 2011

Black Frame & Rusty Axles

There it is!!!
A fully wire-brushed and painted frame. 
Top, sides, and bottom. 

Here's looking at the back section ...
which is finally done! 

Then my wife came outside ...
admired the beautifully done frame and said,
"The axles are rusty."
So true ... but they are next up. 

This is a major accomplishment.  I'm exhausted.
De-constructing it was Milestone 1.
Wire-brushing and painting the frame is Milestone 2.
The axles will be Milestone 3.
There is some discussion  about replacing the axles (I have no idea what these are, but I'm guessing 2500 lb 4" drop axles) with 
3500 lb. 4" drop axles. (I have the electric brakes and hubs)
Even if the axles I purchase aren't plumbed for electrical brakes,
I'll just run parallel wiring down the other side of the frame.

Milestone 4: 
The sub-floor framing  with the plumbing to the tanks ...
which means I'll have to tentatively place the tub ...
in order to figure out how to route the 1-1/2" tubing 
up through the sub-floor  ... with 2 vent tubes. 
Aaaaaaccck!

(I'll worry about that later) 

May 24, 2011

Tank-echtomy

I finally decided that I needed to remove the tanks to effectively de-rust and paint the frame. 

The only things left are the angle-iron tabs that the supporting metal bolts to, in order to support the tanks. 

These supporting angle-irons were originally left bare and never painted.
I'll wire brush them and paint them before putting them back.
The tanks are stacked under the siding.
A token mention of what the trailer originally was - Shasta. 

May 21, 2011

Not Fast Progression ...

Tires are off.  Working my way back on the frame.
Used a high-pressure nozzle to clean out the two tanks.

From the rear - perhaps you can see the white screw-in caps that I purchased to plug the holes in the tanks so that I don't get anymore leaves and junk inside.

This is toilet paper ... it's been in the black-water tank for a good ten years.  You can still see the hearts, sun, flowers and other designs on it.  
It has yet to bio-degrade.
But now the tank and lines are clear of any impurities.
I can probably use this tank to empty a tub into.

May 19, 2011

Wheels Off !!

The axles and hubs without the wheels.
I had to remove them to sand the rails ...
fix the wiring ...
grease the hubs ...
and work on the brakes.

This is evidence of dog chewing ... or rodent.

This is the worst of the rusted rims.
I have to replace at least 2 rims due to rust.

This is the backside of the same rim.
Both paint and rust are flaking on both sides.

While I was at it, I pressure hosed out the two waste storage tanks
got out the leaves, manure, and glops of old toilet paper.
I'm debating on keeping the largest tank to drain the shower/tub.
The smaller tank will be for the sinks.

May 17, 2011

A Little More Black

Front end view
Ok ... So I have been lazy.
Just doing my regular job combined with the necessary paperwork.
Just not motivated.
Time to get back at it again.

Kind of a side view
Time to take the wheels off to work in that area.
Making some progress.

May 7, 2011

Still at the de-Rusting

Significant rust spots get scraped with a putty knife 
and then I use this wire wheel on them.
I use safety glasses that have a magnifying reading lens in them ...
so I can see up close what I am doing.

May 1, 2011

Fighting Rust

You can see by the black overtaking the brown ...
that I am fighting the rust.
Some spots were very bad and I went at them first with the putty knife to flake off the rust scale.  Then I used a wire wheel powered by a drill to generally remove any other rust.
I've been spray painting with flat black Rustoleum.
I'm going to need at least another 4 cans.